Wire Trellis Kits - Stainless Steel Cable Trellis
Stainless Steel Wire Trellis Kits For Self Assembly


 Hub with Stainless Steel Wire")


 Hub with Stainless Steel Wire")
Green Wall Wire Trellis
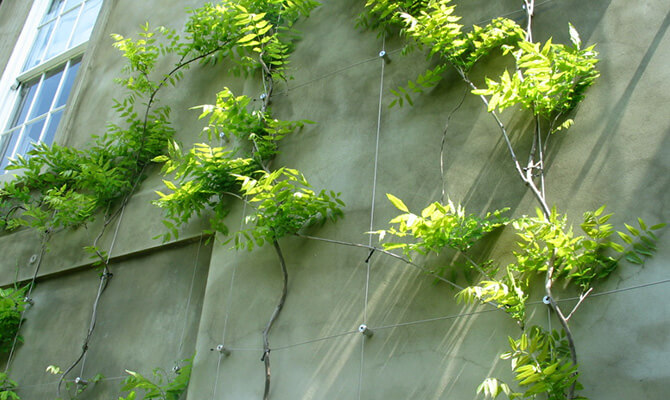
The 'Green Wall' trellis system is made up of a stainless steel 'hub' that allows the crossing and partial stressing and tensioning of cables to create a pattern of trellis sections.
Kits range from 1m x 1m up to 3m x 3m.
50cm Spacing:
Wire Trellis Kit – Garden Plant Support Wire Trellis
| Options | Total Hubs | Total Wire (m) |
Spacing (cm) |
Code | Price (inc VAT) | Quantity |
|---|---|---|---|---|---|---|
| 1m x 1m Wire Trellis | 9 | 6 | 50 | GWK-11-50 | £55.33 | |
| 2m x 1m Wire Trellis | 15 | 11 | 50 | GWK-21-50 | £91.92 | |
| 2m x 2m Wire Trellis | 25 | 20 | 50 | GWK-22-50 | £152.70 | |
| 3m x 1m Wire Trellis | 21 | 16 | 50 | GWK-31-50 | £128.51 | |
| 3m x 2m Wire Trellis | 35 | 29 | 50 | GWK-32-50 | £213.48 | |
| 3m x 3m Wire Trellis | 49 | 42 | 50 | GWK-33-50 | £298.45 |
Tip: To view the product code and full product table on mobile please tilt your device to landscape.
33cm Spacing:
Wire Trellis Kit – Garden Plant Support Wire Trellis
| Options | Total Hubs | Total Wire (m) |
Spacing (cm) |
Code | Price (inc VAT) | Quantity |
|---|---|---|---|---|---|---|
| 1m x 1m (33) Trellis | 16 | 8 | 33 | GWK-11-33 | £96.10 | |
| 2m x 1m (33) Trellis | 28 | 15 | 33 | GWK-21-33 | £167.48 | |
| 2m x 2m (33) Trellis | 49 | 28 | 33 | GWK-22-33 | £291.90 | |
| 3m x 1m (33) Trellis | 40 | 22 | 33 | GWK-31-33 | £238.87 | |
| 3m x 2m (33) Trellis | 70 | 41 | 33 | GWK-32-33 | £416.32 | |
| 3m x 3m (33) Trellis | 100 | 60 | 33 | GWK-33-33 | £593.76 |


Designed to be unobtrusive and highly practical, the wires can be run horizontally and vertically to create a perfect trellis grid or you can use a combination to create a design suited to your own needs.
Our ready sized kits come with all the components pieces required to install a beautiful system that is perfect for creating a green wall, ideal for reinventing and adding style to walls and buildings.
The Kit Consists Of:
- Green Wall Stainless Steel Hubs
- 3mm 7x7 Stainless Steel Cable
- 70mm Stainless Steel Wood Screws
- Plastic Wire Caps
- Allen Key

The Essential Partner
Hand Held Wire Cutters for a neat and tidy cut.


Hub Dimension Information:
- L: 42mm
- L1: 30mm
- L2: 27mm
- OD: 20mm

Ready Sized Green Wall Kit Layouts:
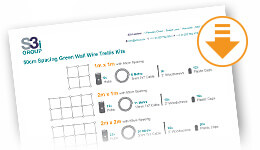
Trellis Kit Layouts download here
FAQ
Plants and Spacing?
Vigorous climbing plants (e.g. Vitis, Wisteria) will cover an area nicely with the lattice squares spaced at 50cm squares, however if you are planting less vigorous climbers (e.g. Lonicera, Clematis) it may be an idea to specify the smaller lattice squares of 33cm.Hub Spacing Options?
Our kits come in a choice of 50cm or 33cm lattice square spacings.What is included?
All kits come with all the component parts for immediate installation: hubs, wire, screws, plastic wire caps and allen key.What if I want a different design?
It is possible create design variations to suit your own needs using the component parts. Please call us if you would like to talk about bespoke sizes or any aspect of your particular design ideas...... narrow spaces, fan shapes, L shapes, even entire building sides.
DIY Installation Advice

Video: How to install the S3i Wire Trellis System
Wire Trellis Installation Advice. An overview of DIY installation, tips and advice. Find out how easy it is to fit one of our Green Wall Wire Trellis Kits yourself.
Need some help?Download and print our installation advice sheet for the DIY Green Wall Wire Trellis System.  |
|
An overview of DIY installation, tips and advice.
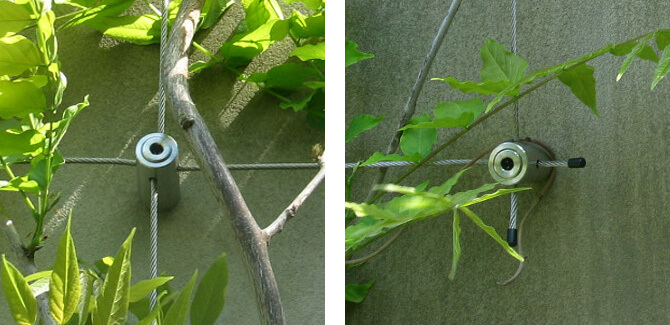
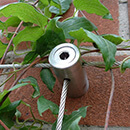
The stainless steel 'HUB' is the key component to the system; the hub allows the crossing and tensioning of the wires to form the lattice shapes required to support any planting for your finished trellis.
These hubs are mounted to the wall surface using the stainless steel wood screws supplied which will pass through the central hole of the hub and into the wall or mounting surface.
The hubs will be spaced according to your particular design. However, careful consideration of the plants is vital. We don't recommend a spacing of more than 50cm even for the most vigorous of climbers, e.g.Vitis. For moderately vigorous climbers such as Clematis, we would recommend spacings of 33cm.

It may be a good idea to layout your design onto the relevant surface with chalk prior to drilling any holes. You don't need to rigidly stick to exact dimensions, take the brick spacing into consideration for instance.

You will need to drill pilot holes into your mounting surface, you can direct mount onto timber. For masonry we recommend using a brown plastic screw plug (not Supplied) to suit the 70mm stainless steel wood screw.

If your plants are particularly heavy or the overall size of the trellis area is very large we might suggest filling the hole with a chemical bonding agent, although this would probably only be required in very ambitious schemes.

Removing the central screw from the hub allows you to screw the hub onto your mounting surface.

Secure your hubs to the wall ensuring the holes are in alignment with each other. Once all hubs are secure insert the central tightening screws loosely, so you can start to run your wire through.

You are now ready to start threading the wires. We recommend you do not cut to final size until all the wires are in place and secured.

We recommend using a hand held wire cutter. You can cut the cables with a hacksaw but we don't recommend it as the cable may fray. Please remember to start with wires cut slightly over length. Start with the horizontal wires and pass them through the hubs, these will remain in place without any tightening. Once these are in place, begin to insert your vertical wires working from an outside edge of the lattice, as you pass through each hub hand tighten the central screw. Leave about an inch or so protruding from the outside edges.

Once all the wires are in place and hand tight, you can then start to tighten with the allen key, work from the outside edges, sequentially, into the middle. When you are tightening the central screws the wire is pushed into the barrel of the hub thus creating the wire tension between the hubs.

When you have finished tightening all the hubs the wire ends can be cut to size.
Then attach the plastic wire caps to the bare wire ends on the outside edges.

The caps are tight fitting to enable a good grip onto the wire and therefore will require a degree of patience. One tip is to widen the opening of the plastic cap by inserting the tip of a pencil to open the gap slightly just prior to placement.

GREEN WALL TRELLIS LEAFLET download here
Questions & Answers
Reviews
Real People
Real Help


