Tensioned Wire Trellis Kits
DIY Tensioned Stainless Steel Wire Trellis Kits


DIY Tensioned Stainless Steel Wire Trellis Kits
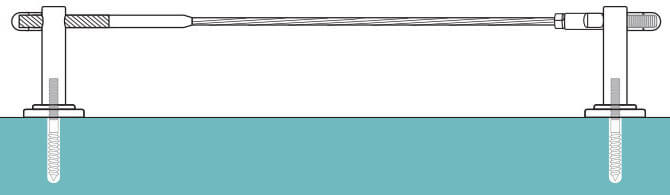
Our unique and versatile wire trellis kits are ideal for creating tensioned stand-off systems to your own specifications, suitable for large scale installations.

Designed to be durable and strong, perfect for high load applications. Quick and easy to install onto masonry and hardwood timber with the use of a few simple tools.
You can mount this tensioned wire trellis system in any direction you require, horizontally, vertically and diagonally to create a stunning living wall design.
Manufactured in the UK with all components produced from 316 marine grade stainless steel, ensuring this product will stand the test of time.
Each kit comes complete with a stainless steel stud already fixed at one end of the wire rope, with our innovative compression fitting supplied to attach at the length you require.
Giving you complete control to create ambitious and stunning wire trellis installations at an affordable price.
DIY Tensioned Wire Trellis Kit
| Options | Wire Ø (mm) |
Wire Length (m) |
L1 (mm) |
L2 (mm) |
D1 (mm) |
D2 (mm) |
D3 (mm) |
Code | Price (inc VAT) | Quantity |
|---|---|---|---|---|---|---|---|---|---|---|
| Wire Trellis Kit - 1m | 4 | 1 | 86 | 96 | 16 | 8 | 40 | TGW-KIT-01 | £41.04 | |
| Wire Trellis Kit - 2m | 4 | 2 | 86 | 96 | 16 | 8 | 40 | TGW-KIT-02 | £42.12 | |
| Wire Trellis Kit - 3m | 4 | 3 | 86 | 96 | 16 | 8 | 40 | TGW-KIT-03 | £43.20 | |
| Wire Trellis Kit - 4m | 4 | 4 | 86 | 96 | 16 | 8 | 40 | TGW-KIT-04 | £44.28 | |
| Wire Trellis Kit - 5m | 4 | 5 | 86 | 96 | 16 | 8 | 40 | TGW-KIT-05 | £45.36 | |
| Wire Trellis Kit - 7.5m | 4 | 7.5 | 86 | 96 | 16 | 8 | 40 | TGW-KIT-07 | £48.06 | |
| Wire Trellis Kit - 10 Metre | 4 | 10 | 86 | 96 | 16 | 8 | 40 | TGW-KIT-010 | £51.02 |
Tip: To view the product code and full product table on mobile please tilt your device to landscape.
Each kit consists of:
- 1 x 4mm diameter 7x7 stainless steel wire rope to your chosen length
- 1 x 4mm M8 threaded stainless steel stud fixed at one end
- 1 x 4mm M8 threaded stainless steel DIY end stud
- 2 x Surface mounting stainless steel hubs
- 2 x Stainless steel M8 nuts
- 2 x Stainless steel M8 dome nuts
- 2 x Stainless steel M8 dual thread screws
Delivered 3 to 5 days from order


Stand-Off Wire Trellis Hubs
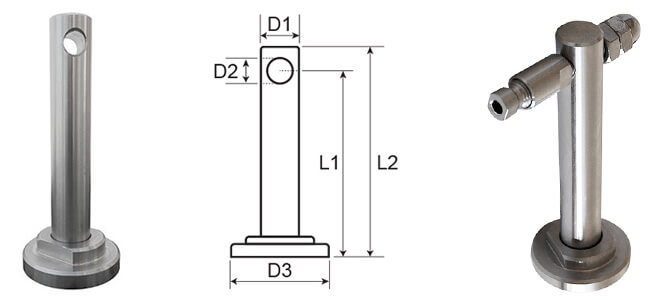
| L1 | L2 | D1 | D2 | D3 |
| 86mm | 96mm | 16mm | 8mm | 40mm |
Additional Stand-Off Wire Trellis Hubs are available to purchase separately.
Ideal addition to our tensioned wire trellis kits for complex wire trellis installations.
Manufactured from marine grade 316 stainless steel.

 |
Video UpdatePlease note for masonry mounting please use a 12mm drill bit and 10mm x 50mm wall plug.not 10mm drill bit as stated in video. |
Video: How to install the S3i Tensioned Wire Trellis System
Tensioned Wire Trellis Installation Advice. An overview of DIY installation, tips and advice. Find out how easy it is to fit one of our tensioned trellis kits yourself.
Need some help?Download and print our installation advice sheet for the DIY Tensioned Wire Trellis Kit.  |
|
Information
Where can I install my wire trellis kit:
The system can be mounted either vertically, horizontally or diagonally onto masonry and timber surfaces.
Vertical gardens offer the advantages of increased growing area and increased accessibility.
No matter which direction you decide to go, we recommend spacing your wires equally to provide an even coverage.
Tensioned wire trellis is perfect for climbers, creepers and rambling plants such as Ivy, Roses, Clematis, Nasturtiums Honeysuckles, Wisteria and vertical vegetable gardens.
Over time with care and attention plants will grow to provide a wonderful and unique feature to any garden setting.

Mounting
Important: For a perfect fit you will need to leave no more than 30mm of thread protruding from your mounting surface.

The dual thread pin allows direct installation into hardwood timber (such as oak) and if combined with the correct rawl plug it is attachable to almost any masonry surface.


Hub Adjustment and Alignment:

Perfect alignment can be achieved by simply turning the adjustable base plate of your hub in or out, to ensure a secure and rigid fixing.
 |
Want to add vertical wireCross clamps are available for the addition of vertical wires (please see below). |
DIY Installation

Mounting Trellis Hubs
The tensioned cable trellis system is suitable for flat mounting onto either wooden posts or masonry wall surfaces using the mounting screws supplied.
Note : when mounting onto solid masonry surfaces (not mortar) please drill a 12mm hole and insert a grey 10mm x 50mm plastic wall plug before fastening. If a wall is particularly brittle or old - a chemical resin may be applied to further strengthen the hold.
The Essential Partner
Hand Held Wire Cutters for a neat and tidy cut.


An overview of DIY installation tips and advice.
1. Getting StartedIt is a good idea to layout your design onto the relevant surface with a pen or chalk prior to drilling any holes, taking factors such as brick spacing into consideration. |
 |
2. Drill Pilot HolesThe dual thread pin allows direct installation into hardwood timber (such as oak) or if combined with the correct rawl plug it is attachable to almost any masonry surface. We recommend a 6mm or 7mm drill piece for wood installation or a 12mm if using a grey 10mm x 50mm plug on solid brick (not mortar) to reduce the chance of cracking). |
 |
3. Insert Screw FixingScrew the dual thread screws in to place using a hex head key. Ensure you leave no more than 30mm of thread protruding. |
 |
4. Attach HubsScrew the surface mounting hubs onto the dual thread screws. Perfect alignment of the cross hole can be achieved by simply turning the adjustable base plate of your hub in or out, to ensure a secure and rigid fixing. |
 |
5. Attach Fixed Cable EndThread your wire through the first hub, so that the fixed wire end can be secured - using a stainless steel nut (supplied). Remember to leave only a small amount of thread, so that as you tension the wire, more thread will be revealed to provide thread for the dome end nut. |
 |
6. Measure Your WirePlace the DIY stud end in place through the other hub. Now simply tension the cable by pulling and align to the spanner flat of the DIY compression fitting. Mark your wire ready for cutting with either a pen or chalk. |
 |
7. Cut Your WireCut your wire to required length. We recommend using a set of good Hand Held Wire Cutters to give you a neat and tidy cut. |
 |
8. DIY Compression Threaded End StudYou are now ready to attach the DIY threaded end stud. The first step is to take apart the threaded end stud by unscrewing the threaded end stud from the nose piece. |
 |
9. Thread Nose Piece onto Wire RopePlace the threaded nose piece over the stainless steel wire. |
 |
10. Thread Cone onto Wire RopePlace the cone onto the wire rope and push into the threaded nose piece. |
 |
11. Place Threaded End Stud onto Wire RopeTake the stainless steel end stud and push onto the wire rope, bringing the three component parts together. Turn in opposite directions to thread them together. |
 |
12. Secure DIY End FittingUsing 8mm and 9 mm spanners/wrenches, screw the two sections together until tight. |
 |
13. Position DIY End FittingInsert threaded end through the fixing hole of the hub. |
 |
14. Secure End Stud In PlaceAttach the stainless steel nut and dome nut, Using a wrench tighten the nuts against each other to create a secure rigid fix. |
 |
15. Applying TensionNow return to the pre-fixed cable end, using a 9mm spanner/wrench simply tighten the stainless steel nut to achieve the desired wire tension. |
 |
16. Finish Your Assembly With The Dome NutWhen you are happy with the wire tension, thread the dome nut on and tighten the nuts against each other. |
 |
Tensioned Wire Trellis Examples

Adding Vertical Wire To Your Trellis System
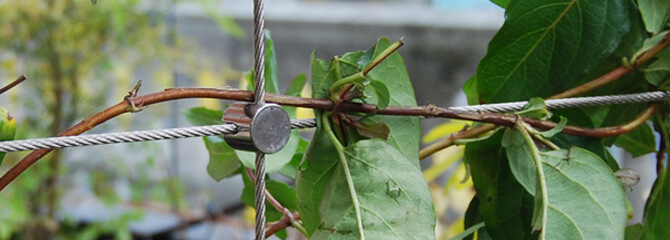
It is possible to add vertical wires to horizontal tensioned wire trellis (see pic above) by using wire cross clamps to hold the vertical wire in place.
Quick and easy to add to any new or existing wire trellis system, simply choose the clamp size to suit your wire diameter. View our full range of Cross Clamps.
We recommend using 4mm Wire Rope Cross Clamp for 90 degree cross over of wires.

Questions & Answers
Reviews
You may be interested in...

4mm 7x7 Stainless Steel Wire to match horizontal trellis wire.

Hand held Wire Cutters for a precise and neat cut.

Hex Head Key to secure cross clamp.

Wire Ring Clamp, ideal for plant supports and trellis.


