Sta-Lok Swageless Rigging - Stalok DIY Terminals
Sta-Lok Self Fit Terminals for Wire Rope

Sta-Lok swageless stainless steel terminals and fittings designed to suit most applications, ideal for DIY rigging projects.
|
|
||||
|
|
||||
|
|
||||
|
|
||||
|
|
||||
|
|
||||
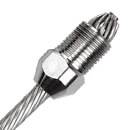
Sta-Lok fittings are a simple mechanical method of terminating wire ropes from 3mm up to 26mm, can be used for right hand and left hand lay 1x19, 7x19, 7x7 and compacted strand wire rope.
Designed to work under constant loads and variable shock loading and the termination is stronger than the wire rope itself. In all situations Sta-Lok Terminals have proven totally reliable.
Sta-Lok fittings are manufactured in the UK from 316 (marine) grade stainless steel grade.,/p>
Easy to assemble on site using a few simple hand tools.
Sta-Lok terminals are reusable and are supplied with 1x19 wedges as standard.
A different wedge is required for 1x19, 7 strand and compacted strand wire rope.
All Sta-Lok Wedges are laser marked for eay identification and selection.
You may be interested in...

Stainless Steel Wire Rope available in a choice of sizes, lengths and grades.

Stainless Steel Thimbles to create reinforced eye/loop in a wire rope.

Wire Rope Cutters for stainless steel wire and cable.

Hand Splicing Tool for crimping standard type A ferrules.


